Battery switch on travel trailer function is crucial for managing your RV’s power. Understanding how to use and maintain your battery switch is key to preventing dead batteries and ensuring a smooth camping experience. This guide covers different switch types, wiring, troubleshooting, safety, and selecting the right switch for your needs. We’ll break down the complexities of your travel trailer’s electrical system, empowering you to confidently manage your power sources.
From simple on/off switches to more sophisticated systems that allow you to select between your vehicle’s battery and your house battery, or even both simultaneously, we’ll explore the nuances of each. We’ll also cover preventative maintenance to extend the life of your switch and crucial safety precautions to keep you and your RV safe.
Understanding Battery Switch Functionality in Travel Trailers
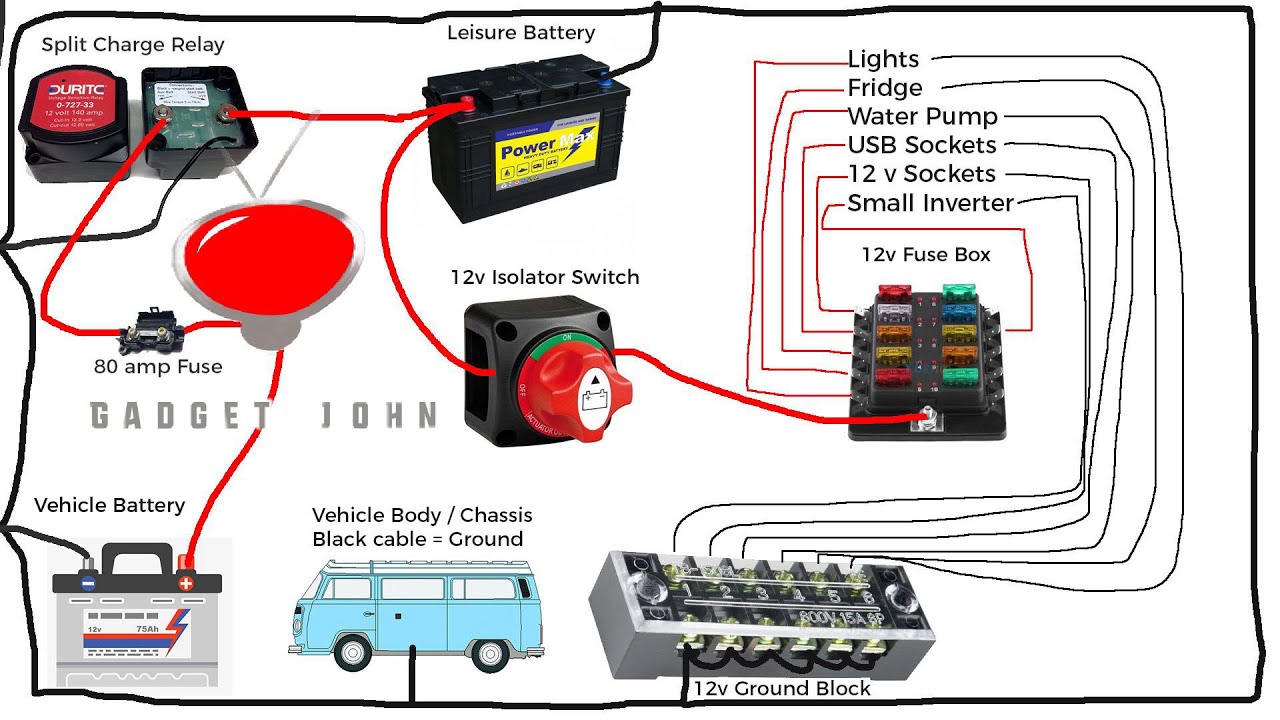
A battery switch is a crucial component in a travel trailer’s electrical system, allowing you to manage the power flow from your house batteries to the trailer’s appliances and accessories. Understanding how it works and how to properly connect it is vital for safe and efficient operation. This section will cover the different types of switches, typical wiring, and a step-by-step connection guide.
Types of Battery Switches
Travel trailers typically utilize one of two main types of battery switches: the simple disconnect switch and the more versatile 1-2-Both switch. The disconnect switch simply allows you to completely isolate your house batteries from the trailer’s electrical system, preventing accidental drain and improving safety. The 1-2-Both switch offers more control, allowing you to use either the house batteries, the tow vehicle’s battery, or both simultaneously.
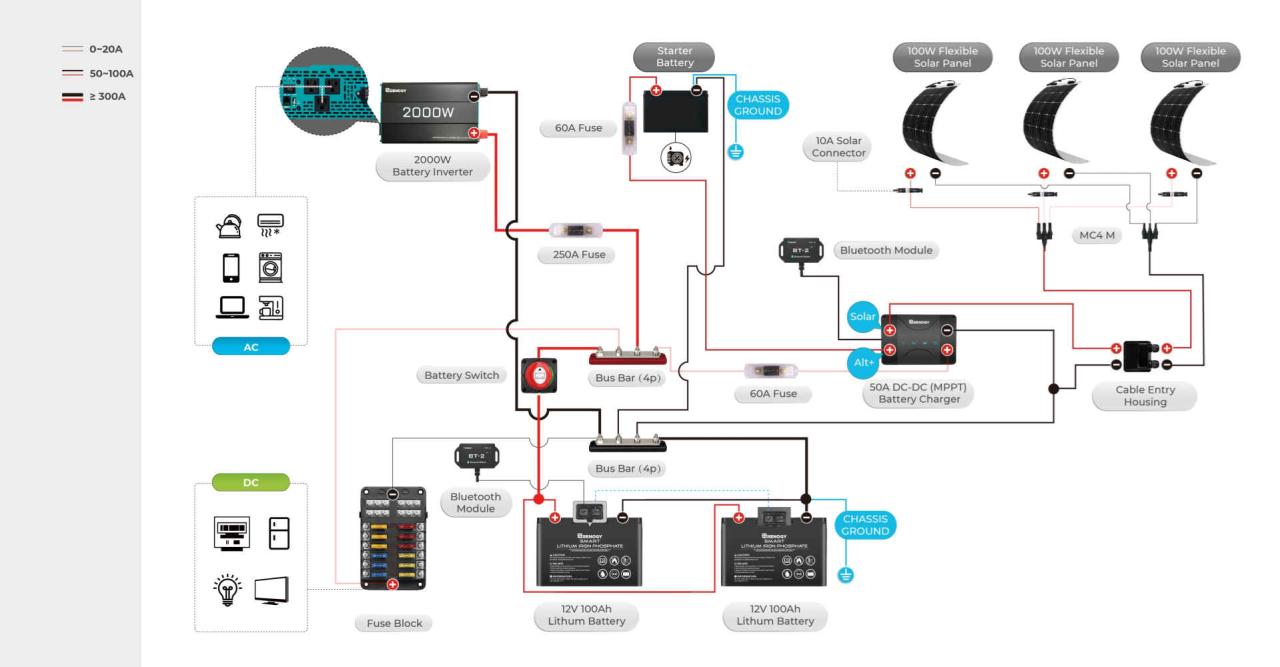
Some more sophisticated systems might include a battery isolator, which automatically manages charging from the tow vehicle without a manual switch.
Typical Wiring Diagrams for Battery Switch Setups
A basic disconnect switch setup involves a single switch connected in series with the positive (+) cable leading from the house battery bank to the trailer’s distribution panel. The negative (-) cable typically runs directly to the chassis ground. For a 1-2-Both switch, the wiring is more complex. The switch has three positions: “1” connects only the house battery bank, “2” connects only the tow vehicle battery, and “Both” connects both battery banks.
The wiring would involve separate positive cables from each battery, running to the switch, and then to the distribution panel. A common negative bus bar or connection point grounds both battery banks. Always consult your specific switch’s instructions for accurate wiring. Incorrect wiring can lead to short circuits or damage to your electrical system.
Connecting a Battery Switch to a Travel Trailer’s Electrical System
This is a task best left to someone experienced with 12V electrical systems. Improper installation can lead to serious injury or damage. Always disconnect the negative (-) battery cable before working on any electrical components.
- Gather Your Materials: You will need the battery switch, appropriate gauge wiring, wire connectors, a circuit breaker (recommended), and tools for crimping and connecting wires.
- Identify Battery and Distribution Panel Connections: Locate the positive (+) and negative (-) terminals on your house battery bank and the corresponding input points on your trailer’s distribution panel.
- Install the Switch: Securely mount the battery switch in a convenient and easily accessible location, protecting it from the elements.
- Connect the Positive (+) Cables: Connect the positive (+) cable from the battery bank to the switch’s input. Then, connect a second positive (+) cable from the switch’s output to the distribution panel’s input. Use appropriate-sized wire connectors and ensure all connections are secure and well-insulated.
- Connect the Negative (-) Cables: Connect the negative (-) cable from the battery bank directly to the trailer’s chassis ground. Do not run the negative cable through the switch.
- Test the System: After all connections are made, carefully test the system to ensure that the switch functions correctly and that power is properly routed.
Comparison of Battery Switch Types
| Feature | Disconnect Switch | 1-2-Both Switch | Battery Isolator |
|---|---|---|---|
| Cost | Low | Medium | High |
| Complexity | Low | Medium | High |
| Functionality | On/Off | House, Tow Vehicle, or Both | Automatic charging from tow vehicle |
| Advantages | Simple, inexpensive, safe | Versatile, allows use of both batteries | Convenient, automatic charging |
| Disadvantages | Limited functionality | More complex wiring | Expensive, potentially complex troubleshooting |
Battery Switch Operation and Maintenance
Properly operating and maintaining your travel trailer’s battery switch is crucial for reliable power and extending the life of your batteries. Understanding the switch’s function and how to troubleshoot problems will save you headaches and potential breakdowns on the road.
Switching between your travel trailer’s house battery and your vehicle’s battery is usually a straightforward process. Most switches are simple rotary selectors or rocker switches with clearly labeled positions. Before operating the switch, always consult your specific travel trailer’s manual for detailed instructions and diagrams as configurations can vary. Generally, you’ll find positions for “off,” “house battery,” “vehicle battery,” and sometimes a “both” or “combined” position (use caution with this, as it can lead to battery drain if not managed carefully).
Switching Between Battery Sources
The procedure for switching between battery sources is typically intuitive. To use the house battery, simply rotate or flip the switch to the “house” position. Similarly, to use the vehicle battery to charge the house battery or power the trailer, switch to the “vehicle” position. Remember to always turn the switch to the “off” position when not using the batteries to prevent accidental drain.
If your switch has a “both” setting, only use it for charging the house battery from the vehicle battery; otherwise, you risk draining both batteries simultaneously.
Troubleshooting Common Battery Switch Problems
Several issues can arise with your battery switch. Identifying the problem is the first step to fixing it. Common problems include no power to the trailer, intermittent power, or unexpected battery drain.
A flowchart can help systematically diagnose these problems:
Flowchart for Troubleshooting a Malfunctioning Battery Switch:
Start -> Is the switch in the correct position? Yes -> Check fuses and breakers. No power? Yes -> Check battery connections. No power?
Yes -> Replace the switch. No -> Check for corrosion on terminals. No power? Yes -> Clean terminals. No -> Check for loose wiring.
No power? Yes -> Repair/replace wiring. No -> Problem solved.
Preventative Maintenance for Battery Switches
Regular maintenance can significantly extend the lifespan of your battery switch. This includes regularly inspecting the switch for any signs of damage, corrosion, or loose connections. Clean the terminals with a wire brush and baking soda solution to remove corrosion. Also, check the wiring for any fraying or damage. Ensure the switch is securely mounted to prevent vibrations from loosening connections.
A yearly inspection as part of your overall RV maintenance routine is recommended.
Battery Switch and Power Management in Travel Trailers
Proper power management is crucial for extending the lifespan of your travel trailer batteries and ensuring you always have power when you need it. Ignoring this can lead to frustrating situations like dead batteries mid-trip, leaving you stranded and without essential amenities. Understanding how your battery switch interacts with your power consumption is key to preventing this.A battery switch acts as the central control point for your trailer’s power system.
It allows you to isolate different battery banks (house batteries and potentially a starting battery for your tow vehicle) and select which bank powers your appliances. This selective control is vital for preventing unwanted drain from one battery bank by another, ensuring efficient power usage.
Common Causes of Premature Battery Discharge and Mitigation with a Battery Switch
Several factors contribute to premature battery discharge in travel trailers. Leaving lights or appliances on unintentionally is a common culprit. Parasitic draws, small but constant power drains from devices even when switched off, also contribute significantly. A faulty converter or charger can also over-discharge your batteries. A battery switch allows you to disconnect the house batteries from the rest of the system when not in use, significantly reducing the risk of these issues leading to a dead battery.
For example, if you leave a light on, with the switch properly engaged, only that specific circuit, not your entire battery bank, will drain.
Best Practices for Managing Power Consumption in a Travel Trailer
Effective power management is a combination of proactive habits and mindful usage. Here are some key strategies to keep your batteries charged and ready:
- Turn off lights and appliances when not in use: This seems obvious, but it’s the most effective way to conserve power. Even small appliances can drain your batteries quickly over time.
- Unplug devices when not charging: Phone chargers, laptops, and other electronics continue to draw a small amount of power even when the device is fully charged.
- Use energy-efficient appliances: LED lighting uses significantly less power than incandescent bulbs. Consider the energy consumption of appliances before purchasing them for your trailer.
- Monitor your battery levels regularly: Use a battery monitor to keep track of your battery’s state of charge. This allows you to identify and address any issues before they lead to a complete discharge. For instance, if you notice a consistent and unusually rapid drop in your battery level, you can investigate potential problems, such as a parasitic draw.
- Utilize your solar panels (if equipped): Solar panels provide a clean and renewable source of power to supplement your batteries, reducing the reliance on your tow vehicle’s alternator or shore power.
- Periodically disconnect your house batteries: When you’re not using your trailer for an extended period, disconnecting your house batteries with the battery switch prevents parasitic draws from slowly draining them. This ensures your batteries are ready for your next adventure.
Safety Considerations with Battery Switches
Working with your travel trailer’s electrical system, including the battery switch, requires careful attention to safety. Improper handling can lead to serious injury from electric shock, burns, or even fire. Understanding the potential hazards and following proper procedures is crucial for a safe and enjoyable RV experience.
Risks Associated with Improper Battery Switch Installation or Use, Battery switch on travel trailer function
Incorrect installation or use of a battery switch poses several significant risks. A poorly installed switch might create loose connections, leading to arcing and sparking, which can ignite flammable materials nearby. Using the wrong type of switch for your battery bank’s amperage can cause overheating and potential failure, potentially leading to a fire. Furthermore, incorrect wiring can result in unintended shorts, causing damage to your RV’s electrical system or even battery explosions.
Always consult the manufacturer’s instructions and, if unsure, seek professional help from a qualified RV technician.
Safe Disconnection of the Battery Switch in Emergency Situations
In an emergency, knowing how to quickly and safely disconnect your battery switch is paramount. Before any work, always ensure the switch is turned to the “OFF” position. Then, using insulated tools, carefully disconnect the wires leading to the battery switch. Remember to disconnect the negative (-) terminal first to prevent accidental short circuits. After disconnection, clearly mark the wires to aid in reconnection.
This process helps prevent further damage and ensures your safety during emergency repairs or troubleshooting.
Potential Hazards and Solutions
Understanding potential hazards and having solutions readily available is crucial for safe battery switch operation.
Here’s a list of common hazards and their corresponding solutions:
- Hazard: Electric shock from exposed wires or a faulty switch. Solution: Always use insulated tools and wear appropriate safety gear, such as rubber gloves. Regularly inspect wires and connections for damage and replace any worn or frayed components.
- Hazard: Battery explosion due to overcharging or short circuits. Solution: Use a properly sized battery charger and regularly check the battery’s voltage and electrolyte levels. Ensure all connections are secure and free of corrosion.
- Hazard: Fire due to overheating or arcing. Solution: Use the correct size fuse or circuit breaker for your battery bank. Ensure proper ventilation around the battery and battery switch to prevent heat buildup. Regularly inspect for signs of overheating or damage.
- Hazard: Accidental contact with the battery terminals while the switch is on. Solution: Always turn the battery switch to the “OFF” position before performing any maintenance or repairs near the battery. Use protective eyewear to prevent battery acid splashes.
Selecting the Right Battery Switch for a Travel Trailer
Choosing the correct battery switch for your travel trailer is crucial for safe and reliable power management. A poorly chosen switch can lead to overheating, power failures, and even fire hazards. This section will guide you through the process of selecting a switch that meets your specific needs.
Battery Switch Amperage Ratings
Determining the appropriate amperage rating for your battery switch is paramount. The amperage rating indicates the maximum current the switch can handle continuously without damage. To calculate the required amperage, you need to consider the total amperage draw of all devices connected to your battery bank. This includes appliances like refrigerators, air conditioners, lights, and water pumps.
Add up the amperage draw of each device and add a safety margin (typically 25-50%) to account for simultaneous operation and potential surges. For example, if your total amperage draw is 100 amps, a 150-amp switch would provide a sufficient safety margin. Always choose a switch with an amperage rating significantly higher than your calculated total to prevent overheating and potential failures.
So, you’re planning a trip? Awesome! Don’t forget to sort out your travel insurance – it’s a lifesaver. Check out Aon travel insurance for comprehensive coverage. They’ve got options to suit various budgets and trip lengths. And if you need another opinion, Aon travel insurance also offers a wide range of plans; comparing quotes is always a good idea to find the best fit for your needs.
Get insured and enjoy your adventure worry-free!
Battery Switch Selection Based on Travel Trailer Size and Power Requirements
The size and power requirements of your travel trailer directly influence the type of battery switch you need. Smaller trailers with fewer appliances may only require a simple, lower-amperage switch. Larger trailers with multiple high-draw appliances will require a higher amperage switch, potentially with additional features like remote control or multiple battery banks. Consider whether you need a switch that can handle a single battery bank or multiple banks (for example, a dedicated house battery and a dedicated starting battery).
If you plan on using high-power appliances, like an air conditioner or microwave, ensure the switch can handle the surge current. Also, consider the physical space available for installation.
So, you’re planning a trip? Awesome! Don’t forget travel insurance – it’s a lifesaver. Check out aon travel insurance for comprehensive coverage. They’ve got various plans to suit different needs and budgets. And if you’re looking for another option with a slightly different focus, consider exploring aon travel insurance as well; comparing options is always a smart move before you book that flight!
Comparison of Battery Switch Brands and Models
The following table compares several popular battery switch brands and models. Note that prices and features can vary depending on the retailer and specific model. This table is for illustrative purposes only, and prices and availability are subject to change.
| Brand | Model | Amperage Rating | Features | Approximate Price (USD) |
|---|---|---|---|---|
| Blue Sea Systems | 7611 | 150A | Dual battery switch, LED indicators, waterproof | $100 – $150 |
| Perko | 0544DP2 | 200A | Dual battery switch, keyed, waterproof | $120 – $180 |
| AGS | Various Models | Variable (50A – 300A) | Variety of configurations, including remote switches and multiple battery banks. | $75 – $300+ |
| Xantrex | Various Models | Variable (50A – 200A) | High quality, often found in higher-end RVs. | $150 – $300+ |
Visual Representation of Battery Switch Installation: Battery Switch On Travel Trailer Function
Installing a battery switch in your travel trailer is a straightforward process, but proper execution ensures safe and reliable power management. This section provides a detailed visual walkthrough, helping you understand the installation process and the final appearance of a correctly installed switch. Remember to always disconnect your battery before starting any electrical work.
The installation process involves several key steps, from preparing the wiring to securing the switch itself. You’ll need basic tools, including a screwdriver (likely both Phillips and flathead), wire strippers, crimpers, and possibly a drill with appropriate sized bits depending on your chosen mounting location and switch type. Safety glasses and gloves are also recommended.
Battery Switch Assembly Components
A typical battery switch assembly consists of several key components. These include the switch itself (often a rotary switch with multiple positions), appropriately sized battery cables (usually heavy-gauge wire for sufficient current capacity), mounting hardware (screws, nuts, and possibly a bracket or backing plate), and possibly wire connectors or terminals for secure and safe connections. Some switches incorporate a built-in fuse or circuit breaker for added safety.
The quality and size of these components directly impact the overall safety and reliability of the system. A higher amperage switch and heavier gauge wiring are crucial for handling the current demands of your travel trailer appliances.
Step-by-Step Installation Process
First, carefully plan the switch’s location. It should be easily accessible but protected from the elements and potential damage. A common location is within a readily accessible compartment, ideally near the batteries themselves but still protected from moisture and accidental contact. Once you’ve chosen a location, mark the mounting points and drill any necessary holes. Next, securely mount the switch using the provided hardware.
Ensure the switch is firmly mounted and level. Next, carefully connect the battery cables to the switch terminals. Properly stripping and crimping the wires is essential to ensure a good connection. Double-check your wiring diagram to ensure correct polarity (+ and -) before making any connections. After wiring, secure all connections with wire ties or other appropriate methods to prevent movement and potential short circuits.
Finally, test the switch in all positions, verifying that power is correctly routed to the desired circuits. A properly installed switch will operate smoothly and reliably, and the wiring will be neatly organized and securely fastened.
Properly Installed Switch: Visual Description
From the front, a properly installed switch will be neatly mounted, with clear labeling indicating each switch position (e.g., “Battery 1,” “Battery 2,” “Both,” “Off”). The switch should be flush with the mounting surface, and the labels should be easily readable. From the side, the wiring should be neatly organized and secured, with no loose or dangling wires. The cable connections should be snug and secure, showing no signs of damage or strain.
From the rear, the wiring should be clearly visible, organized, and securely connected to the switch terminals. All wire connections should be properly insulated to prevent short circuits. The overall installation should look professional and secure, exhibiting no signs of sloppy work or potential hazards. Remember that a well-installed switch not only ensures proper function but also contributes to the overall safety and reliability of your travel trailer’s electrical system.
Mastering your travel trailer’s battery switch is a fundamental skill for any RVer. By understanding the different types of switches, their operation, and safety procedures, you can avoid common problems, extend the life of your batteries, and enjoy worry-free power on the road. Remember, proper power management and regular maintenance are key to a successful and enjoyable camping experience.
So get out there and enjoy the open road!
FAQ Overview
What happens if I accidentally leave my battery switch on “both”?
Leaving the switch on “both” can drain your batteries quickly if your appliances are drawing more power than your batteries can replenish. This is especially true if your vehicle isn’t running to recharge the batteries.
How often should I check my battery switch?
Visually inspect your battery switch monthly for corrosion, loose connections, or any signs of damage. Tighten any loose connections as needed.
Can I install a battery switch myself?
While possible, installing a battery switch incorrectly can be dangerous. If you’re not comfortable working with electrical systems, it’s best to hire a qualified RV technician.
My battery switch is making a clicking sound. What’s wrong?
A clicking sound often indicates a faulty switch or a problem with the electrical connections. Check for loose wires and corrosion. If the problem persists, replace the switch.
